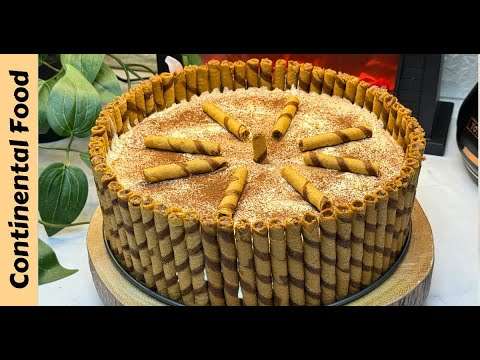
Welcome to the world of exquisite desserts where every bite is a symphony of flavors and textures. Our Wafer Stick Cake recipe is more than just a dessert; it’s a culinary adventure that marries the nostalgia of wafer sticks with the elegance of a creamy cheesecake. This recipe isn’t just about ingredients and instructions; it’s about creating unforgettable moments shared with loved ones over a slice of indulgence.
Join us as we embark on a journey to create a dessert masterpiece that will leave a lasting impression.
layers of crisp wafer sticks enveloped in clouds of creamy goodness, each bite sending waves of delight through your taste buds. But this isn’t just any cake; it’s a creation born out of passion and creativity, designed to captivate both the eyes and the palate.
So, if you’re ready to elevate your dessert game and embark on a culinary escapade, then grab your apron and let’s dive into the world of Wafer Stick Cake perfection.
Indulge in the delightful fusion of crunchy wafer sticks and creamy goodness with our Wafer Stick Cake recipe! Perfect for any occasion, this cake is a surefire way to dazzle your loved ones. Combining the simplicity of wafer sticks with the richness of cream cheese and Nutella, this cake promises a taste sensation like no other.
Follow along with our step-by-step guide to create a dessert masterpiece that will leave everyone asking for more.
Ingredients Wafer Stick Cake Recipe:
- Wafer sticks (as required)
- 2 cups digestive biscuits, crumbled
- 1/2 cup melted butter
- 240ml whipping cream
- 1/2 cup caster sugar
- 1 tsp vanilla essence
- 250g cream cheese
- 2 tbsp Nutella
- 1 tsp cocoa powder
Steps Wafer Stick Cake:
- Begin by preparing the base of your cake. In a bowl, combine the crumbled digestive biscuits with the melted butter until well mixed.
- Press the biscuit mixture firmly into the base of a springform cake tin to create an even layer. Chill in the refrigerator while you prepare the filling.
- In a separate bowl, whip the whipping cream until stiff peaks form. Set aside.
- In another bowl, beat together the cream cheese, caster sugar, and vanilla essence until smooth and creamy.
- Gently fold the whipped cream into the cream cheese mixture until fully incorporated.
- Take the chilled cake tin with the biscuit base and spread a layer of the cream cheese mixture over it.
- Arrange wafer sticks vertically around the edges of the tin, pressing them lightly into the cream cheese mixture.
- Drizzle Nutella over the cream cheese layer and sprinkle with cocoa powder for a decadent touch.
- Repeat the layers as desired, alternating between the cream cheese mixture, wafer sticks, Nutella, and cocoa powder.
- Once all layers are assembled, refrigerate the cake for at least 4 hours, or until set.
- Before serving, carefully remove the cake from the tin and garnish with additional wafer sticks and a dusting of cocoa powder if desired.
With its harmonious blend of textures and flavors, our Wafer Stick Cake is a true crowd-pleaser. Whether it’s a special celebration or simply a sweet craving, this cake is bound to impress. Give it a try and let the compliments roll in!
Follow me for more delicious recipes:
- Youtube: / @monadnan26
- pinterest:https://www.pinterest.co.uk/continent…
- TikTok:https://www.tiktok.com/@continentalfo…
- Instagram: / continentalfood87
- Facebook:https://www.facebook.com/profile.php?…
- Twitter: / foo9continental
Our Wafer Stick Cake isn’t just a dessert; it’s a delightful journey of flavors and textures that will leave your taste buds singing. Whether shared with loved ones or savored in a moment of indulgence, this cake is sure to create unforgettable memories. So, whip up a batch, slice into the decadence, and let each bite transport you to dessert heaven.
As we wrap up this culinary adventure, remember that the joy of baking extends far beyond the kitchen. Each slice of our Wafer Stick Cake carries with it the warmth of shared moments, the sweetness of laughter, and the comfort of togetherness.
So, as you savor the last crumbs of this delectable treat, may it serve as a reminder to embrace life’s simple pleasures and cherish the moments spent with those we love. Here’s to many more delicious memories created around the table.
Can I use different flavors of wafer sticks?
Absolutely! Feel free to experiment with various flavors to customize your cake.
Can I make this cake ahead of time?
Yes, this cake can be made ahead and stored in the refrigerator until ready to serve. Just be sure to cover it well to prevent any odors from affecting the flavor.
Can I substitute whipped cream with whipped topping?
While whipped cream provides the best texture and flavor, whipped topping can be used as a substitute if desired.

